1 引言
之前已经知道最小化训练了。最小化确实是最小,一是没有日志去支撑分析,二是在单卡运行一个很小的模型在结果验证上也差强人意。
所以本文就如何验证模型训练效果以及量化配置两个方面,在原有代码基础上进一步展开。
2 什么是wandb
wandb https://wandb.ai/ 是一个在线平台,可以帮助记录模型训练过程中的各类参数。比起tensorboard等工具,它有几个好处:
- 团队协作方便
- 交互性好
- 自动传云
- 无需手动可视化
2.1 安装
pip install wandb之后,导入使用,一般在项目开头进行配置。 上 https://wandb.ai 注册一个账号,直接github登录。之后遵循流程,创建token,记下token即可。
我们也可以给不同的用户设置不同的权限。但一般都是自己训练,随便设置team,自己是admin就行了。
然后在你的命令行里敲下wandb login,输入你的token。因为我已经登录过了,所以提示如下。  wandb login
2.2 使用
在transformers的TrainningArugments的配置中report_to这一参数,其解释如下。
report_to (
strorList[str], optional, defaults to"all") — The list of integrations to report the results and logs to. Supported platforms are"azure_ml","clearml","codecarbon","comet_ml","dagshub","dvclive","flyte","mlflow","neptune","tensorboard", and"wandb". Use"all"to report to all integrations installed,"none"for no integrations.
report_to支持多个平台,让用户不用再关心可视化的问题,只要专注训练,把可视化交给对应的平台。本次主要说说 wandb。
wandb包含如下几个步骤:
2.2.1 wandb init
wandb.init(
	project="qwen25-dpo",
	name="qwen25-7b-extraction",
	config={
		"model": model_name,
		"max_length": max_length,
		"lora_r": 32,
		"lora_alpha": 64,
		"learning_rate": 2e-4,
		"epochs": 3,
		"batch_size": 4
	}
)初始化wandb,至少需要配置project和name。project是你的项目,而name是项目中每次运行的名称,举例来说,我的project可能叫qwen-dpo,而name可以是7b-extract,再详细一点可以增加时间或者次数。
config是试验的配置,要试验中相符。如果不配置,wandb也会按照默认内容进行进行记录和绘制,但是如果有需要记录的内容,还是需要手动记录的。
因为参数可能经常调整,像这样在文件开头就写死配置的情况反而少见的。一般来说我们可以通过 命令行传参或者 配置文件读取的方式。
2.2.2 report_to="wandb"
在DPOConfig中,把report_to的值改成"wandb",如果有其他要上传的,可以使用list比如`["wandb", "tensorboard"]
2.2.3 wandb.finish()
当整个训练流程结束,需要显式的结束它。
2.3 完整代码
继(一)之后,加上wandb的完整代码如下
from transformers import AutoModelForCausalLM, AutoTokenizer
from datasets import load_dataset, Dataset
from trl import DPOConfig, DPOTrainer
from peft import get_peft_model, LoraConfig
import wandb

model_name = "Qwen/Qwen2.5-1.5B-Instruct"
model = AutoModelForCausalLM.from_pretrained(model_name, trust_remote_code=True, device_map="auto")
tokenizer = AutoTokenizer.from_pretrained(model_name)

# wandb 设置
wandb.init(
	project="qwen25-dpo",
	name="qwen25-7b-extraction",
	config={
		"model": model_name,
		"max_length": max_length,
		"lora_r": 8,
		"lora_alpha": 32,
		"learning_rate": 1e-5,
		"epochs": 1,
		"batch_size": 4
	}
)

LoraConfig = LoraConfig(
    r=8,
    lora_alpha=32,
    target_modules=["q_proj", "v_proj"],
    lora_dropout=0.1,
    bias="none",
    task_type="CAUSAL_LM",
)

model = get_peft_model(model, LoraConfig)

dataset = load_dataset("phimes/DPO-bad-boy-chinese-for-Qwen2.5-extended")
print(dataset)


train_dataset = dataset["train"]
test_dataset = dataset["test"]

training_args = DPOConfig(
    output_dir="./output",
    num_train_epochs=1,
    per_device_train_batch_size=4,
    per_device_eval_batch_size=4,
    gradient_accumulation_steps=4,
    gradient_checkpointing=True,
    learning_rate=1e-5,
    evaluation_strategy="steps",
    eval_steps=10,
    logging_dir="./logs",
    logging_steps=10,
    # wandb 配置
    report_to="wandb"
)

dpo_trainer = DPOTrainer(
    model=model,
    ref_model=None,
    train_dataset=train_dataset,
    eval_dataset=test_dataset,
    processing_class=tokenizer,
    args=training_args,
)

if __name__ == "__main__":
	try:
	    dpo_trainer.train()
	finally:
		# wandb记录结束
wandb.finish()2.4 日志能看什么?
训练起来以后,访问 wandb.ai/home 以后,我们到对应的project(wandb init中设置的)找到对应的name。如果是训练过程中,你可以看到status是running。点进去就能找到一堆曲线记录。
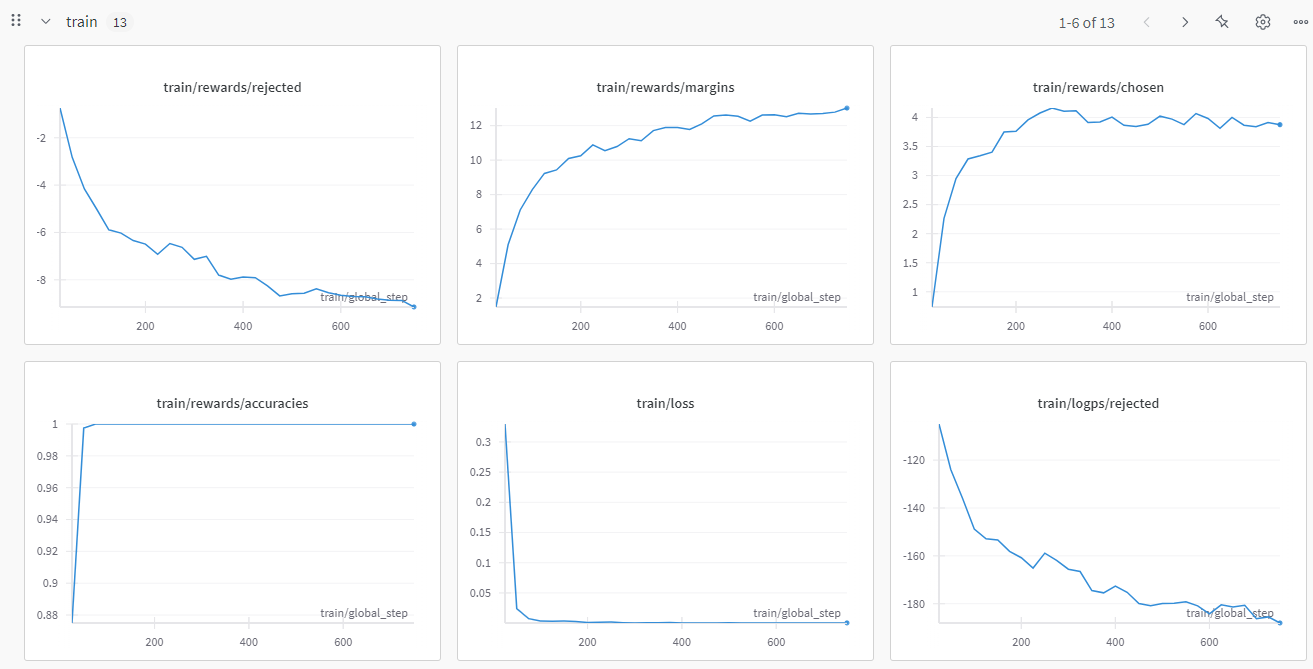
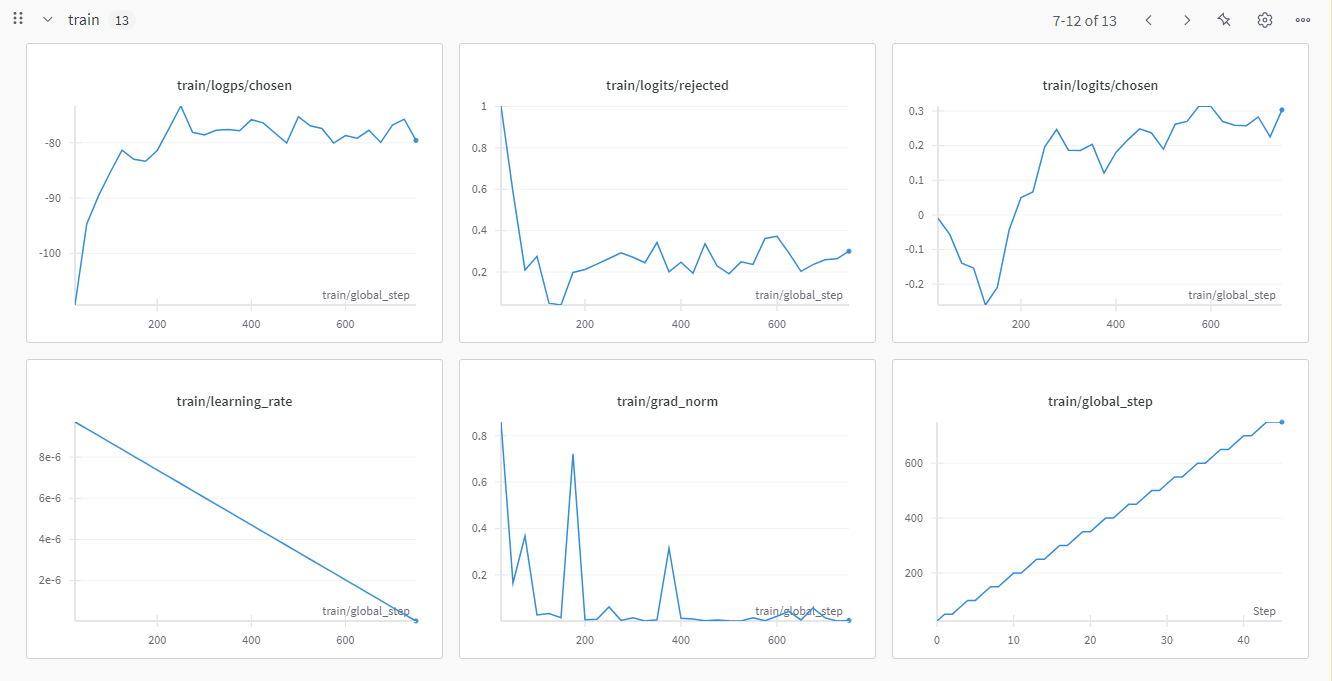
2.4.1 train的曲线
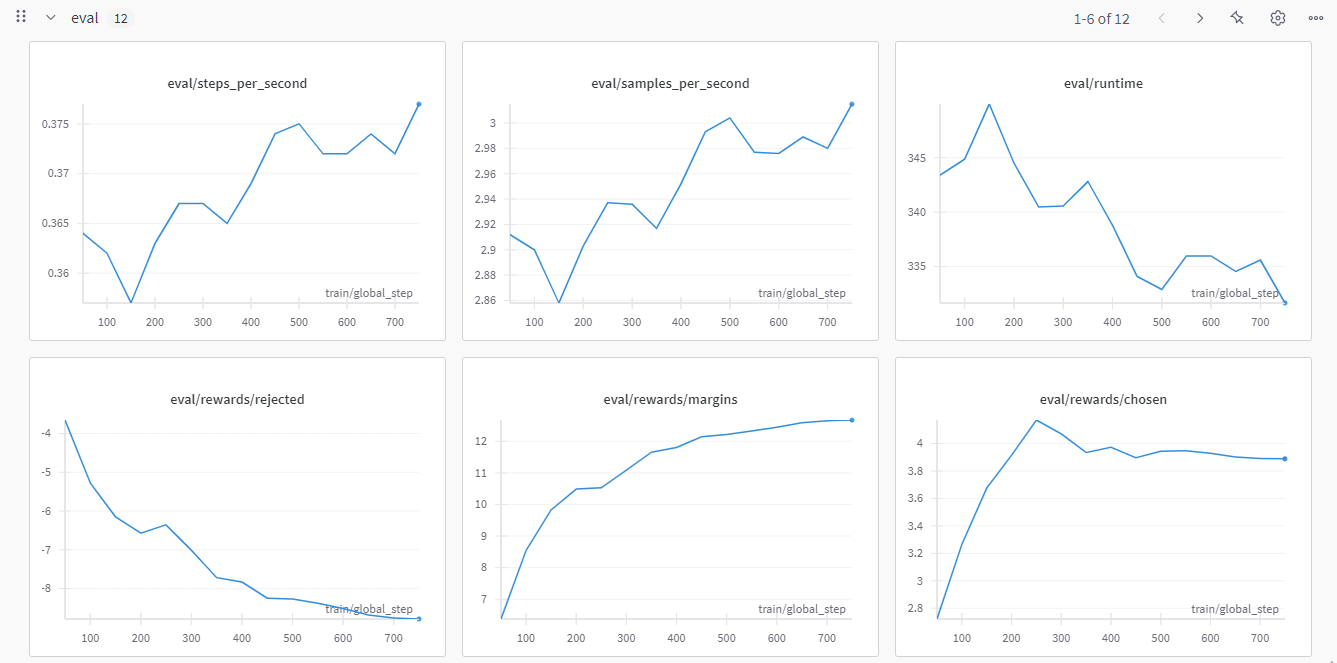
2.4.2 eval的曲线
2.5 我们关心哪些曲线?
2.5.1 常规指标
- loss :可以直接反馈人类偏好和策略的差异,通常我们希望曲线整体下降,且趋势稳定。
- grad_norm:也是深度学习的核心指标之一的。可以反映模型收敛状态以及潜在问题,比如常见的“梯度爆炸”和“梯度消失“。我们希望看到梯度曲线至少不要过分的震荡。在我贴的图中,你可以看到grad_norm其实是有明显的凸起的
2.5.2 DPO相关指标
DPO相关的曲线主要有三类。最主要的就是reward的chosen、reject、margin。其次是两个细粒度指标,logits和logp的reject和chosen
- train/rewards/reject、margin以及chosen:直观的解释就是对训练的拒绝、差距以及接受的奖励值变化。也就是说,训练“符合人类偏好”(chosen)的奖励(reward),应该持续平稳的走高。这说明我们的策略在正确的路线上。同理那么对“不符合人类偏好”(reject)的奖励(reward),应该持续平稳的走低。那么这两者的差值(margin)就会越来越大。
- reward/logtis/reject 和chosen:
logits是模型最后的一层输出,在未归一化之前的分数。在实际计算logp的时候,要对logits进行log_softmax处理。是一个细粒度的指标。同样的,我们希望chosen持续平稳走高,reject平稳走低。 - reward/logp/reject 和 chosen:
logp是策略模型生成的回答的的对数概率。也是我们细粒度的指标之一。其曲线形状我们也是希望和上述两种一样。
QUESTION
细粒度指标这么多,怎么看?
2.6 DPO的参数和原理
原理部分,不关心可以跳过,但是如果你想大概了解一下怎么看指标以及为什么这样看,那么就接着品一下
首先看DPO的损失函数:
是输入提示 是偏好的响应 是不偏好的响应 是优化策略模型 是参考模型 是控制偏好强度的超参数 是sigmoid函数
这里可以看到,其实我们的chosen就是:
该定义可以总结成:奖励制
而logp,其含义是优化策略模型
进一步展开来说,从公式上看,不论是chosen还是reject,都是两个模型的logp对比的结果。
所以问题又回到了
QUESTION
当我的已经通过loss看出了训练的损失,又观察了train/reward/chosen、reject以及margin,为什么我还需要logits和logp的曲线?
2.6.1 logp
从公式中,可以理解 chosen和reject都是优化策略模型对参考模型的一个对比差值,其结果是相对的。而logp本身是绝对的。
所以当我们观察chosen、reject和margin的时候,因为其值都是logp计算出来的。
自然会存在一种情况。就是logp上升,而参考模型的的logp在下降。
logp,就发现其实这训练过程有问题。
另一种情况是,当chosen上升,reject也上升,margin并没有有效扩大。这可能是模型过度自信,比如参考模型的logp来看,问题到底出在哪里了。
2.6.2 logits
logits是比logp更为原始的形式。作为模型的最后一层输出,logits包含了更多的有效信息。
logits作为没有归一化的分数向量,可以理解为模型对每个token的“原始置信度”,值越大则模型更倾向于选择该token。
表示为softmax,可以将其转换为概率分布。
然后我们再对其取对数,得到
这一步,我们称为 log-softmax。但是,等等,直接计算
首先计算了logits的最大值m,然后对每个
pytorh内置的log_softmax函数已经实现了logits到logp的转化:
import torch
import torch.nn.functional as F

# 假设 logits 的形状为 [batch_size, seq_len, vocab_size]
logits = torch.randn(2, 10, 50257)

logp = F.log_softmax(logits, dim=-1) # 输出形状 [batch_size, seq_len, vocab_size]

# 提取特定位置(如句末)的 logp 值
logp_last_token = logp[:, -1, :] # 形状 [batch_size, vocab_size]
logp_specific_token = logp[:, :, 1234] # 提取词表中第1234个token的logp,形状 [batch_size, seq_len]当然,我们也可以根据公式手动实现一个logits到logp的转换
def manual_log_softmax(logits: torch.Tensor, dim: int = -1) -> torch.Tensor:
    # 计算最大值(数值稳定)
    max_logits = logits.max(dim=dim, keepdim=True).values

    # 减去最大值后计算指数
    stable_logits = logits - max_logits

    # 计算对数归一化项
    log_sum_exp = torch.log(torch.sum(torch.exp(stable_logits), dim=dim, keepdim=True))

    # 计算 logp
    logp = stable_logits - log_sum_exp
    return logp

# 验证手动实现与PyTorch内置函数是否一致
logits = torch.randn(2, 10, 50257)
logp_pytorch = F.log_softmax(logits, dim=-1)
logp_manual = manual_log_softmax(logits, dim=-1)

assert torch.allclose(logp_pytorch, logp_manual, atol=1e-6), "手动实现与PyTorch结果不一致!"2.7 总结
| 监控指标 | Logits | Logp |
|---|---|---|
| 信息类型 | 原始未归一化分数 | 归一化后的对数概率 |
| 反映内容 | 模型内部状态、梯度稳定性、初始化问题 | 最终输出概率、奖励计算 |
3 量化配置
3.1 为什么要量化?
量化(Quantization)的核心动机在于解决大规模语言模型对计算资源的极端依赖。随着模型参数规模增长,全精度(如FP32)参数的存储与计算成本急剧上升,远超消费级硬件的承载能力。
以70B参数模型为例,FP32精度下仅加载模型就需约280GB显存,而通过4-bit量化可压缩至35GB,显存占用降低至1/8,使得单张消费级显卡(如4090)也能运行超大规模模型。
量化技术通过将高精度浮点数映射为低位整数(如INT8/INT4),显著减少存储开销和内存带宽需求,同时适配边缘设备、移动端等资源受限场景。
量化不仅是推理阶段的优化手段,更贯穿模型全生命周期,实现训练与部署的高效协同。在训练阶段,混合精度训练(如BF16/FP16)已普遍应用,通过量化梯度计算降低显存占用并利用硬件加速能力;
而在微调阶段,结合参数高效方法(如QLoRA),量化技术进一步突破资源瓶颈——例如将基座模型量化为4-bit,仅需5-10%显存即可通过低秩适配器(LoRA)完成微调,使百亿模型在单卡上轻量化迭代。
量化感知训练(QAT)则通过模拟量化噪声,提升模型对低精度计算的鲁棒性,减少精度损失。更重要的是,量化与模型压缩、蒸馏等技术结合,形成了从“训练-压缩-部署”的全栈优化链路,推动大模型从实验室算力密集型研究向产业级低成本落地的范式转变。
3.2 常见的量化
3.2.1 从量化阶段可以分为PTQ和QAT
训练后量化(Post-Training Quantization, PTQ):最常见形式,直接对预训练模型进行量化(如TensorRT/TFLite量化),通常需要少量校准数据。
量化感知训练(Quantization-Aware Training, QAT):在训练过程中模拟量化噪声,使模型适应低精度(如PyTorch的
fake_quant)。
3.2.2 主流量化方式有GPTQ、AWQ、BNB等。
3.2.3 (1) GPTQ(Group-wise Post-Training Quantization)
- 原理 :对权重进行分组量化,每组使用独立的缩放因子(scale),减少量化误差。
- 在huggingface上,可以看到几乎所有的主流模型都有自己的GPTQ-INT4或者INT8版本。
3.2.4 (2) AWQ(Activation-aware Weight Quantization)
- 原理 :结合激活值的分布动态调整量化参数,优先保留重要权重(如大权重)。
- 通俗点说,就是会观察哪些参数的影响力更大,从而把那些影响更小的参数给压缩了。所以AWQ得量化方式在压缩前,要了解模型的参数和重要度。
3.2.5 (3) BNB(BitsandBytes)
- 原理 :支持4-bit和8-bit量化,结合分组量化和异常值处理(如LLM.int8()方法)。
- 这是支持训练时量化的方法。主要场景就是当我们显卡资源有限时,比如一张24G的显卡,我们要进行7B模型的LoRA训练,连权重都加载不上。那如果我们把模型量化了,而LoRA的时候本身占用就小,使用混合精度。那其实12G的显存就绰绰有余了。
3.3 QLoRA的代码实现
本次,主要讨论训练过程中的量化。也就是BitsandBytes。因为我们使用的LoRA方法。所以我们这种先量化再训练(向前和反向传播的时候会还原精度)的方法就是QLoRA。
通过BitsAndBytesConfig,它提供多种量化方法,在平衡模型性能的前提下显著降低显存占用。
注意:如果你的显卡很老,你要查一下是否支持这些方式,比如V100不支持bf16等
from transformers import BitsAndBytesConfig
import torch

bnb_config = BitsAndBytesConfig(
	load_in_4bit=True,
	bnb_4bit_quant_type="nf4",
	bnb_4bit_compute_dtype=torch.bfloat16 if torch.cuda.is_bf16_supported() else torch.float16,  # 自动选择计算类型
	bnb_4bit_use_double_quant=True,
)然后,我们在load模型的时候就可以加上这个量化配置,模型就被我们以量化的方式加载了
model = AutoModelForCausalLM.from_pretrained(
    "Qwen/Qwen2.5-1.5B-Instruct",
    quantization_config=bnb_config
)3.3.1 参数说明
load_in_4bit和load_in_8bit互斥,说明具体的load方式bnb_4bit_quant_type是我们的量化方式,nf4比较新,当硬件兼容性异常(如计算内核报错)时,建议降级至传统fp4量化方案。bnb_4bit_compute_dtype:- 这个参数是模型权重使用4-bit/8-bit格式存储以节省显存,但在实际执行计算过程中,4/8-bit量化权重将动态反量化(Dequantization)为16/32-bit浮点数执行矩阵运算。选择一般遵循
torch.bfloat16>torch.float16>torch.float32 - 不同架构是需要检查支持的精度,比如tesla架构是不支持bf16的
- 这个参数是模型权重使用4-bit/8-bit格式存储以节省显存,但在实际执行计算过程中,4/8-bit量化权重将动态反量化(Dequantization)为16/32-bit浮点数执行矩阵运算。选择一般遵循
bnb_4bit_use_double_quant:双重量化,启用时会进行两次量化,第一次是从32位变成我们设置的4位(在这个例子里),第二次是压缩的缩放因子。大多数情况下,是可以启用的,如果模型有问题,我们可以尝试关掉它,但是对模型质量的影响很小,所以多数来说不会排查到这。所以一般也建议启用。torch_dtype:
QUESTION
量化我知道、LoRA我也知道。那么先量化再LoRA和直接使用量化模型进行LoRA以及我直接全精度LoRA以后再量化,都是什么区别?
PTQ是最常见的,就是全精度的模型,该怎么训练怎么训练,训练完再进行量化,在必须量化这一前提下,其精度损失最小。
那么如果我直接使用量化的模型呢,因为这个模型已经量化过了而且不会变了,可以称为静态量化,那么在此基础上进行LoRA,基座模型本身是低精度的,那么向前传播和反向传播,也是低精度的,这就对我们传播的隐藏状态进行了污染。
那么QLoRA呢,它虽然量化了模型,但是向前和反向传播的时候会恢复精度,从而摆脱了低精度的问题。
3.4 其他配置
用bnb量化加载完模型还有两个地方要修改。
3.4.1 优化器
在DPOConfig中,优化器参数要改为page_adamw_8bit。这是在bitsandbytes专为QLoRA这类方法配置的优化器。
它有两个特点:
- 分页:分页机制可以将暂时用不到的优化器先放到内存中,使得显存占用可以进一步降低。
- 量化:其实降低显存占用并不是核心,量化过的模型和优化器的适配性是另一个关键。
bitsandbytes对模型的量化和8-bit优化器是集成的。否则参数精度的不匹配可能会导致训练不稳定等问题。
bitsandbytes的优化器可以在huggingface和github上找到:
https://github.com/bitsandbytes-foundation/bitsandbytes/blob/main/bitsandbytes/optim/adamw.py
3.4.2 prepare_model_for_kbit_training
另一个是在模型加载之后,peft加载之前。 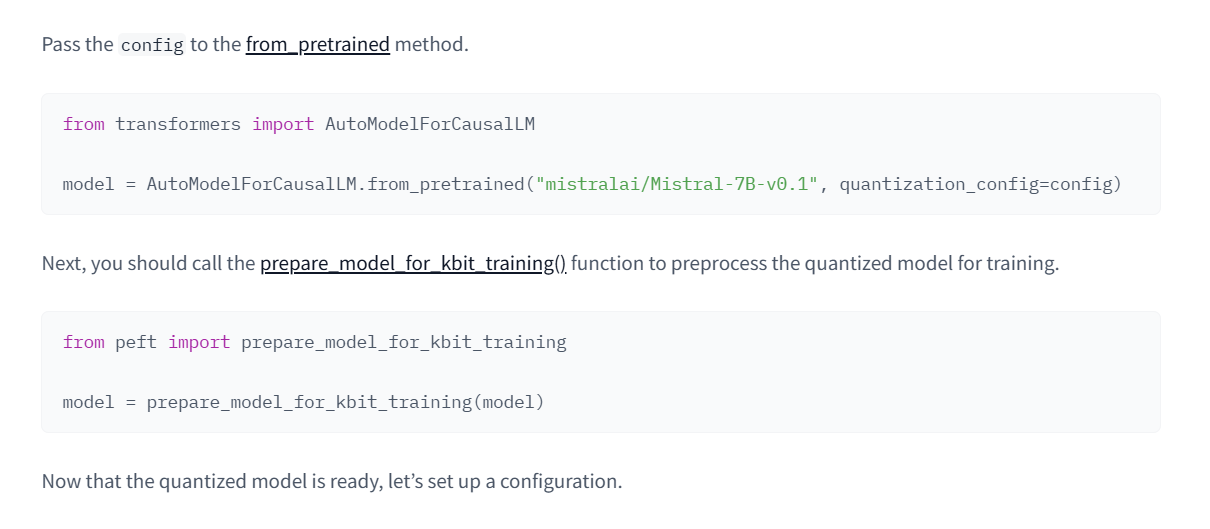 image.png
看一下这个方法的用法:
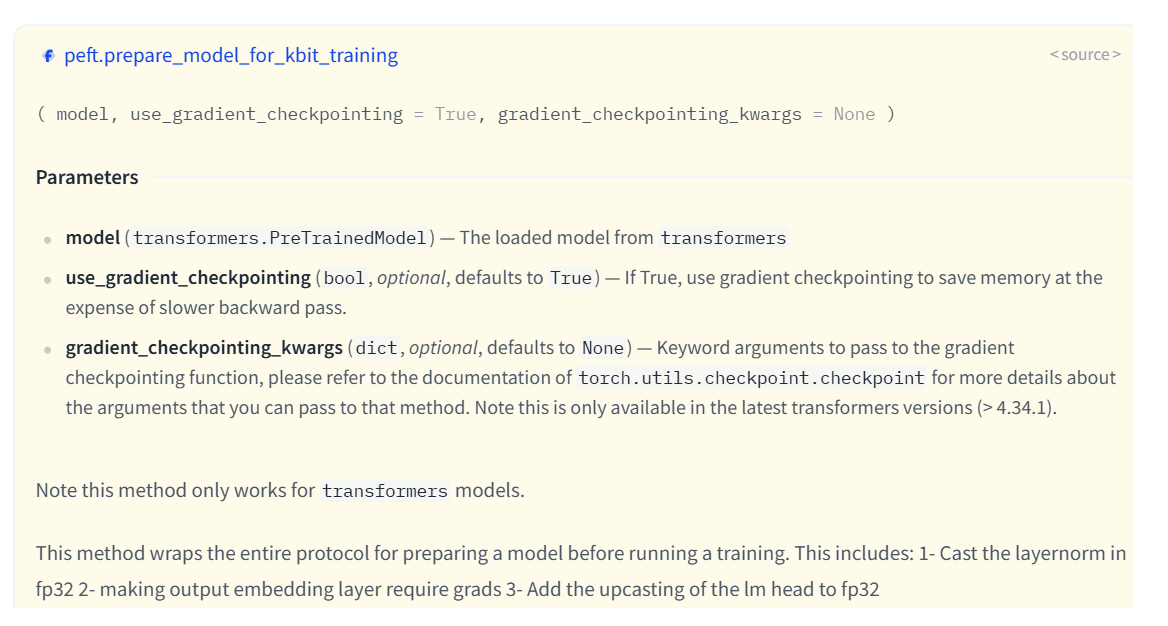
这个方法属于peft库的utils。其实际代码说的也很明白,主要目的是包括:
- 检测模型是否量化:根据不同的量化方法适配。
- LayerNorm的精度转换:量化模型(如4-bit/8-bit)的权重通常是低精度(如int8),但某些层(如LayerNorm)对数值精度敏感。若直接用低精度计算,可能导致梯度不稳定或溢出。该函数会将所有LayerNorm层的参数强制转换为
fp32,以保持计算稳定性。 - 冻结基础模型参数:该函数会冻结基础模型的所有参数(
param.requires_grad = False),确保训练时仅更新少量新增参数(如LoRA适配器),这也是参数高效微调(PEFT)的核心思想。 - 启用梯度检查:根据模型情况决定是否启用梯度检查。
https://github.com/huggingface/peft/blob/main/src/peft/utils/other.py
def prepare_model_for_kbit_training(model, use_gradient_checkpointing=True, gradient_checkpointing_kwargs=None):
    r"""
    Note this method only works for `transformers` models.

    This method wraps the entire protocol for preparing a model before running a training. This includes:
        1- Cast the layernorm in fp32 2- making output embedding layer require grads 3- Add the upcasting of the lm
        head to fp32 4- Freezing the base model layers to ensure they are not updated during training


    Args:
        model (`transformers.PreTrainedModel`):
            The loaded model from `transformers`
        use_gradient_checkpointing (`bool`, *optional*, defaults to `True`):
            If True, use gradient checkpointing to save memory at the expense of slower backward pass.
        gradient_checkpointing_kwargs (`dict`, *optional*, defaults to `None`):
            Keyword arguments to pass to the gradient checkpointing function, please refer to the documentation of
            `torch.utils.checkpoint.checkpoint` for more details about the arguments that you can pass to that method.
            Note this is only available in the latest transformers versions (> 4.34.1).
    """
    loaded_in_kbit = getattr(model, "is_loaded_in_8bit", False) or getattr(model, "is_loaded_in_4bit", False)
    is_gptq_quantized = getattr(model, "quantization_method", None) == "gptq"
    is_aqlm_quantized = getattr(model, "quantization_method", None) == "aqlm"
    is_eetq_quantized = getattr(model, "quantization_method", None) == "eetq"
    is_torchao_quantized = getattr(model, "quantization_method", None) == "torchao"
    is_hqq_quantized = getattr(model, "quantization_method", None) == "hqq" or getattr(model, "hqq_quantized", False)

    if gradient_checkpointing_kwargs is None:
        gradient_checkpointing_kwargs = {}

    for name, param in model.named_parameters():
        # freeze base model's layers
        param.requires_grad = False

    if (
        not is_gptq_quantized
        and not is_aqlm_quantized
        and not is_eetq_quantized
        and not is_hqq_quantized
        and not is_torchao_quantized
    ):
        # cast all non INT8 parameters to fp32
        for param in model.parameters():
            if (
                (param.dtype == torch.float16) or (param.dtype == torch.bfloat16)
            ) and param.__class__.__name__ != "Params4bit":
                param.data = param.data.to(torch.float32)

    if (
        loaded_in_kbit
        or is_gptq_quantized
        or is_aqlm_quantized
        or is_eetq_quantized
        or is_hqq_quantized
        or is_torchao_quantized
    ) and use_gradient_checkpointing:
        # When having `use_reentrant=False` + gradient_checkpointing, there is no need for this hack
        if "use_reentrant" not in gradient_checkpointing_kwargs or gradient_checkpointing_kwargs["use_reentrant"]:
            # For backward compatibility
            if hasattr(model, "enable_input_require_grads"):
                model.enable_input_require_grads()
            else:

                def make_inputs_require_grad(module, input, output):
                    output.requires_grad_(True)

                model.get_input_embeddings().register_forward_hook(make_inputs_require_grad)

        # To support older transformers versions, check if the model supports gradient_checkpointing_kwargs
        _supports_gc_kwargs = "gradient_checkpointing_kwargs" in list(
            inspect.signature(model.gradient_checkpointing_enable).parameters
        )

        if not _supports_gc_kwargs and len(gradient_checkpointing_kwargs) > 0:
            warnings.warn(
                "gradient_checkpointing_kwargs is not supported in this version of transformers. The passed kwargs will be ignored."
                " if you want to use that feature, please upgrade to the latest version of transformers.",
                FutureWarning,
            )

        gc_enable_kwargs = (
            {} if not _supports_gc_kwargs else {"gradient_checkpointing_kwargs": gradient_checkpointing_kwargs}
        )

        # enable gradient checkpointing for memory efficiency
        model.gradient_checkpointing_enable(**gc_enable_kwargs)
return modelQUESTION
能不能不用这个方法?
其实可以,在不添加该方法的情况下。运行训练,其实也成功了。但是确实存在风险,直接训练量化模型可能会导致梯度爆炸/消失、显存溢出或微调效果极差。 所以,该用还得用。
3.5 其他注意事项
在运行过程中,可能会看到一个警告:
UserWarning: None of the inputs have requires_grad=True. Gradients will be None在我们 训练 这一场景下,确实有可能出现。原因有很多的。比如我们启用了gradient_checkpoint=True,确实可能会出现该警告。但只要确认有可训练的参数,就不会实际阻断梯度回传
QUESTION
那如何检查我们是否有可训练的参数呢?
在应用LoRA,也就是model = get_peft_model(model, lora_config)之后我们加入这样的代码
# 查看可训练参数:
model.print_trainable_parameters()

# 查看所有lora层是否正常
for name, param in model.named_parameters():
    if "lora" in name:
print(f"{name}: requires_grad={param.requires_grad}")对于第一个部分,我们会得到这样一个结果: trainable params: 4,530,176 || all params: 1,548,244,480 || trainable%: 0.2926
因为我们用了量化,冻结了基础的模型,使用LoRA训练,所以这个参数量是正常的。
再看看第二个部分,对于所有LoRA要训练的的层,requires_grad应该都是True: 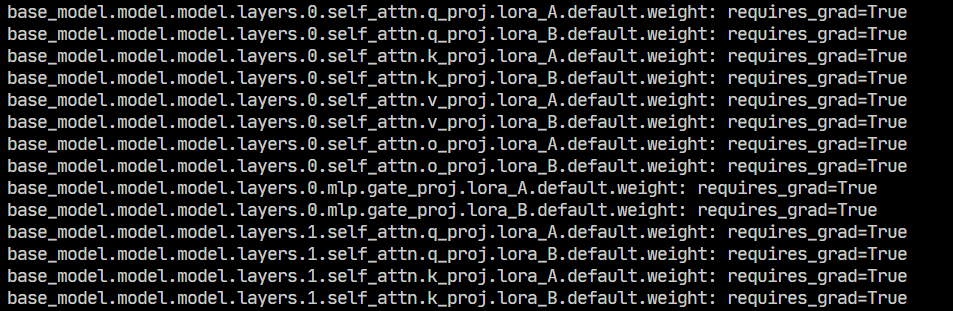 image.png
3.6 完整代码
现在我们看一下使用了QLoRA和wandb的完整代码:
from transformers import AutoModelForCausalLM, AutoTokenizer, BitsAndBytesConfig
from datasets import load_dataset, Dataset
from trl import DPOConfig, DPOTrainer
from peft import get_peft_model, LoraConfig, prepare_model_for_kbit_training
import wandb
import torch
from datetime import datetime

bnb_config = BitsAndBytesConfig(
    load_in_4bit=True,
    bnb_4bit_quant_type="fp4",
    bnb_4bit_compute_dtype=torch.bfloat16 if torch.cuda.is_available() else torch.float16,  # 自动选择计算类型
    bnb_4bit_use_double_quant=True,
)

model_name = "Qwen/Qwen2.5-1.5B-Instruct"

# wandb
date_time = datetime.now().strftime("%Y-%m-%d_%H-%M-%S")
wandb.init(project="qwen", name=f"{model_name}_{date_time}")

# 加载模型
model = AutoModelForCausalLM.from_pretrained(model_name,quantization_config=bnb_config, use_cache=False)
try:
    print(model.model.layers[0].self_attn.q_proj.weight.dtype)
    print(model.model.layers[0].self_attn.q_proj.weight.quant_state)
    print(model.model.layers[0].self_attn.q_proj.weight.quant_type)
    print(type(model.model.layers[0].self_attn.q_proj))
except:
    print("no quant")

tokenizer = AutoTokenizer.from_pretrained(model_name)

# 量化模型的工具方法,确保模型是量化后,且配置正确
# model = prepare_model_for_kbit_training(model)

# Lora 设置
lora_config = LoraConfig(
    r=8,
    lora_alpha=16,
    target_modules=["q_proj", "k_proj", "o_proj", "v_proj", "gate_proj"],
    lora_dropout=0.05,
    bias="none",
    task_type="CAUSAL_LM",
)
# 应用 Lora
model = get_peft_model(model, lora_config)

model.print_trainable_parameters()
for name, param in model.named_parameters():
    if "lora" in name:
        print(f"{name}: requires_grad={param.requires_grad}")

# 加载数据集
dataset = load_dataset("phimes/DPO-bad-boy-chinese-for-Qwen2.5-extended")

train_dataset = dataset["train"]
test_dataset = dataset["test"]

# 训练配置
training_args = DPOConfig(
    output_dir=f"./output", # 输出目录
    num_train_epochs=1, # 训练轮数,1轮
    per_device_train_batch_size=4, # 训练批次大小,2个
    per_device_eval_batch_size=4, # 评估批次大小,2个
    gradient_accumulation_steps=4, # 梯度累积步数,2步
    gradient_checkpointing=True, # 梯度检查点,True
    learning_rate=1e-5, # 学习率,1e-5
    eval_strategy="steps", # 评估策略, 按步数评估
    eval_steps=10, # 每200步,评估一次
    optim="paged_adamw_8bit",
    logging_dir="./logs", # 日志目录,保存日志
    logging_steps=20, # 每100步,保存一次日志
    bf16=False,
    fp16=True,
    report_to=["wandb"],         # 启用wandb记录,其他还可以tensorboard等工具,但是这里只用wandb。
    run_name=f"{model_name}_{date_time}",     # wandb运行名称,将保存在本地,和init的name可以不一致,
)

dpo_trainer = DPOTrainer(
    model=model,
    train_dataset=train_dataset,
    eval_dataset=test_dataset,
    processing_class=tokenizer,
    args=training_args,
)


if __name__ == "__main__":
    try:
        dpo_trainer.train()
    except Exception as e:
        print(e)
    finally:
wandb.finish()4 结语
一开始其实没打算写太多理论相关的,但是实际写的过程中,把每一个参数扣过去,每一个提示查完,再把公式实际推一下,收货还是很大的。
至此,其实一个完整的DPO训练已经结束了。基本的训练代码很简单,但是这次我们专注在训练后如何看自己训的好不好,除了直观的从结果上判断,更重要的是,我们从不同的指标曲线中看出训练过程。
另外,使用QLoRA也解决单机进行LoRA训练,连参数都加载不起来的情况。现在可以训练更大的模型了!
所以,下一章,我们要开始使用分布式了。一、我们要通过分布式训练更大的模型。二、可以通过分布式发挥并行训练来加速(有些时候并不一定能加速)
5 参考
[1] Hugging Face Team. (2024). Installation Guide. Hugging Face Bitsandbytes Documentation. Retrieved from https://huggingface.co/docs/bitsandbytes/main/en/installation
[2] TRL Development Team. (2024). DPO Training Script (dpo.py). Hugging Face TRL GitHub Repository. Retrieved from https://github.com/huggingface/trl/blob/main/trl/scripts/dpo.py
[3] TRL Development Team. (2024). DPO Trainer Module (dpo_trainer.py). Hugging Face TRL GitHub Repository. Retrieved from https://github.com/huggingface/trl/blob/main/trl/trainer/dpo_trainer.py
[4] 知乎技术专栏. (2023). LORA微调系列(一):LORA和它的基本原理. 知乎专栏. Retrieved from https://zhuanlan.zhihu.com/p/646791309
[5] CSDN技术博客. (2023). PEFT LoraConfig参数详解. CSDN平台. Retrieved from https://blog.csdn.net/shebao3333/article/details/134523779
[6] Weights & Biases Team. (2024). Initialization Reference. Weights & Biases Documentation. Retrieved from https://docs.wandb.ai/ref/python/init/
[7] Artidoro, P. (2024). QLoRA Implementation (qlora.py). QLoRA GitHub Repository. Retrieved from https://github.com/artidoro/qlora/blob/main/qlora.py
[8] Bitsandbytes Team. (2024). 8-bit AdamW Optimizer. Bitsandbytes Documentation. Retrieved from https://huggingface.co/docs/bitsandbytes/main/reference/optim/adamw#bitsandbytes.optim.PagedAdamW8bit
[9] Hugging Face PEFT Team. (2024). Quantization Guide. Hugging Face PEFT Documentation. Retrieved from https://huggingface.co/docs/peft/developer_guides/quantization
[10] LLaMA Factory Community. (2024). QLoRA Model Preparation Discussion. GitHub Discussions. Retrieved from https://github.com/hiyouga/LLaMA-Factory/discussions/6928
[11] CSDN深度学习专栏. (2024). QLoRA模型训练全流程. CSDN平台. Retrieved from https://blog.csdn.net/yanqianglifei/article/details/143878392
[[工程实现]]